

In this article, I want to briefly discuss how to use Font Awesome in NativeScript. This method can also be applied to other font icon libraries such as Google's Material Design Icons, and others.
The process is quite simple and easy. First, download Font Awesome from the official website: https://fontawesome.com/v6/download. If a newer version is available, feel free to use that instead. At the time of writing this article, the latest version is Font Awesome 6.

Next, copy the Font Awesome file with the .ttf (TrueType Font) extension into your YOUR_NATIVESCRIPT_PROJECT/app/fonts folder as shown in the image above.
Once the .ttf file is copied, open your terminal or command prompt and navigate to your project directory, then type the command: ns fonts. The output will look something like this:
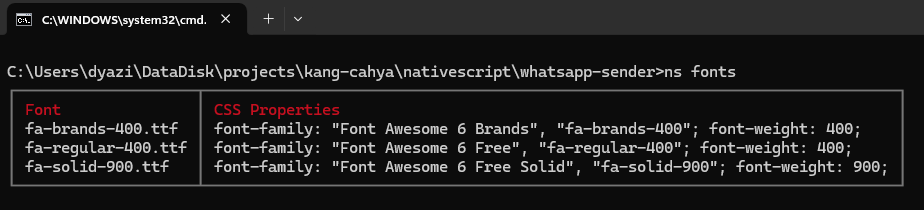
Then, in your global CSS file, simply add the following styles:
.fab (fa-brands or FontAwesome Brands)
.fab {
  font-family: "Font Awesome 6 Brands", "fa-brands-400";
  font-weight: 400;
}
.far (fa-regular or FontAwesome Regular)
.far {
  font-family: "Font Awesome 6 Free", "fa-regular-400";
  font-weight: 400;
}
.fas (fa-solid or FontAwesome Solid)
.fas {
  font-family: "Font Awesome 6 Free Solid", "fa-solid-900";
  font-weight: 900;
}
To use Font Awesome icons, you’ll need to use their unicode values. Make sure you know the icon type — whether it belongs to the regular, solid, or brands category — and use the corresponding CSS class (.far, .fas, or .fab).
You can find the unicode values on the Font Awesome website, as shown below:

The format for writing it is approximately:
&#x + unicode;Here are some usage examples:
<!-- Example of using fonts in Tags <Label> -->
<Label class="fas" text=""></Label>
<!-- Example of using fonts in Tags <Image> -->
<Image src="font://" class="fas" />
That’s all for today’s discussion. I hope you found it helpful. Thank you! :)
Posting Komentar